
Summary
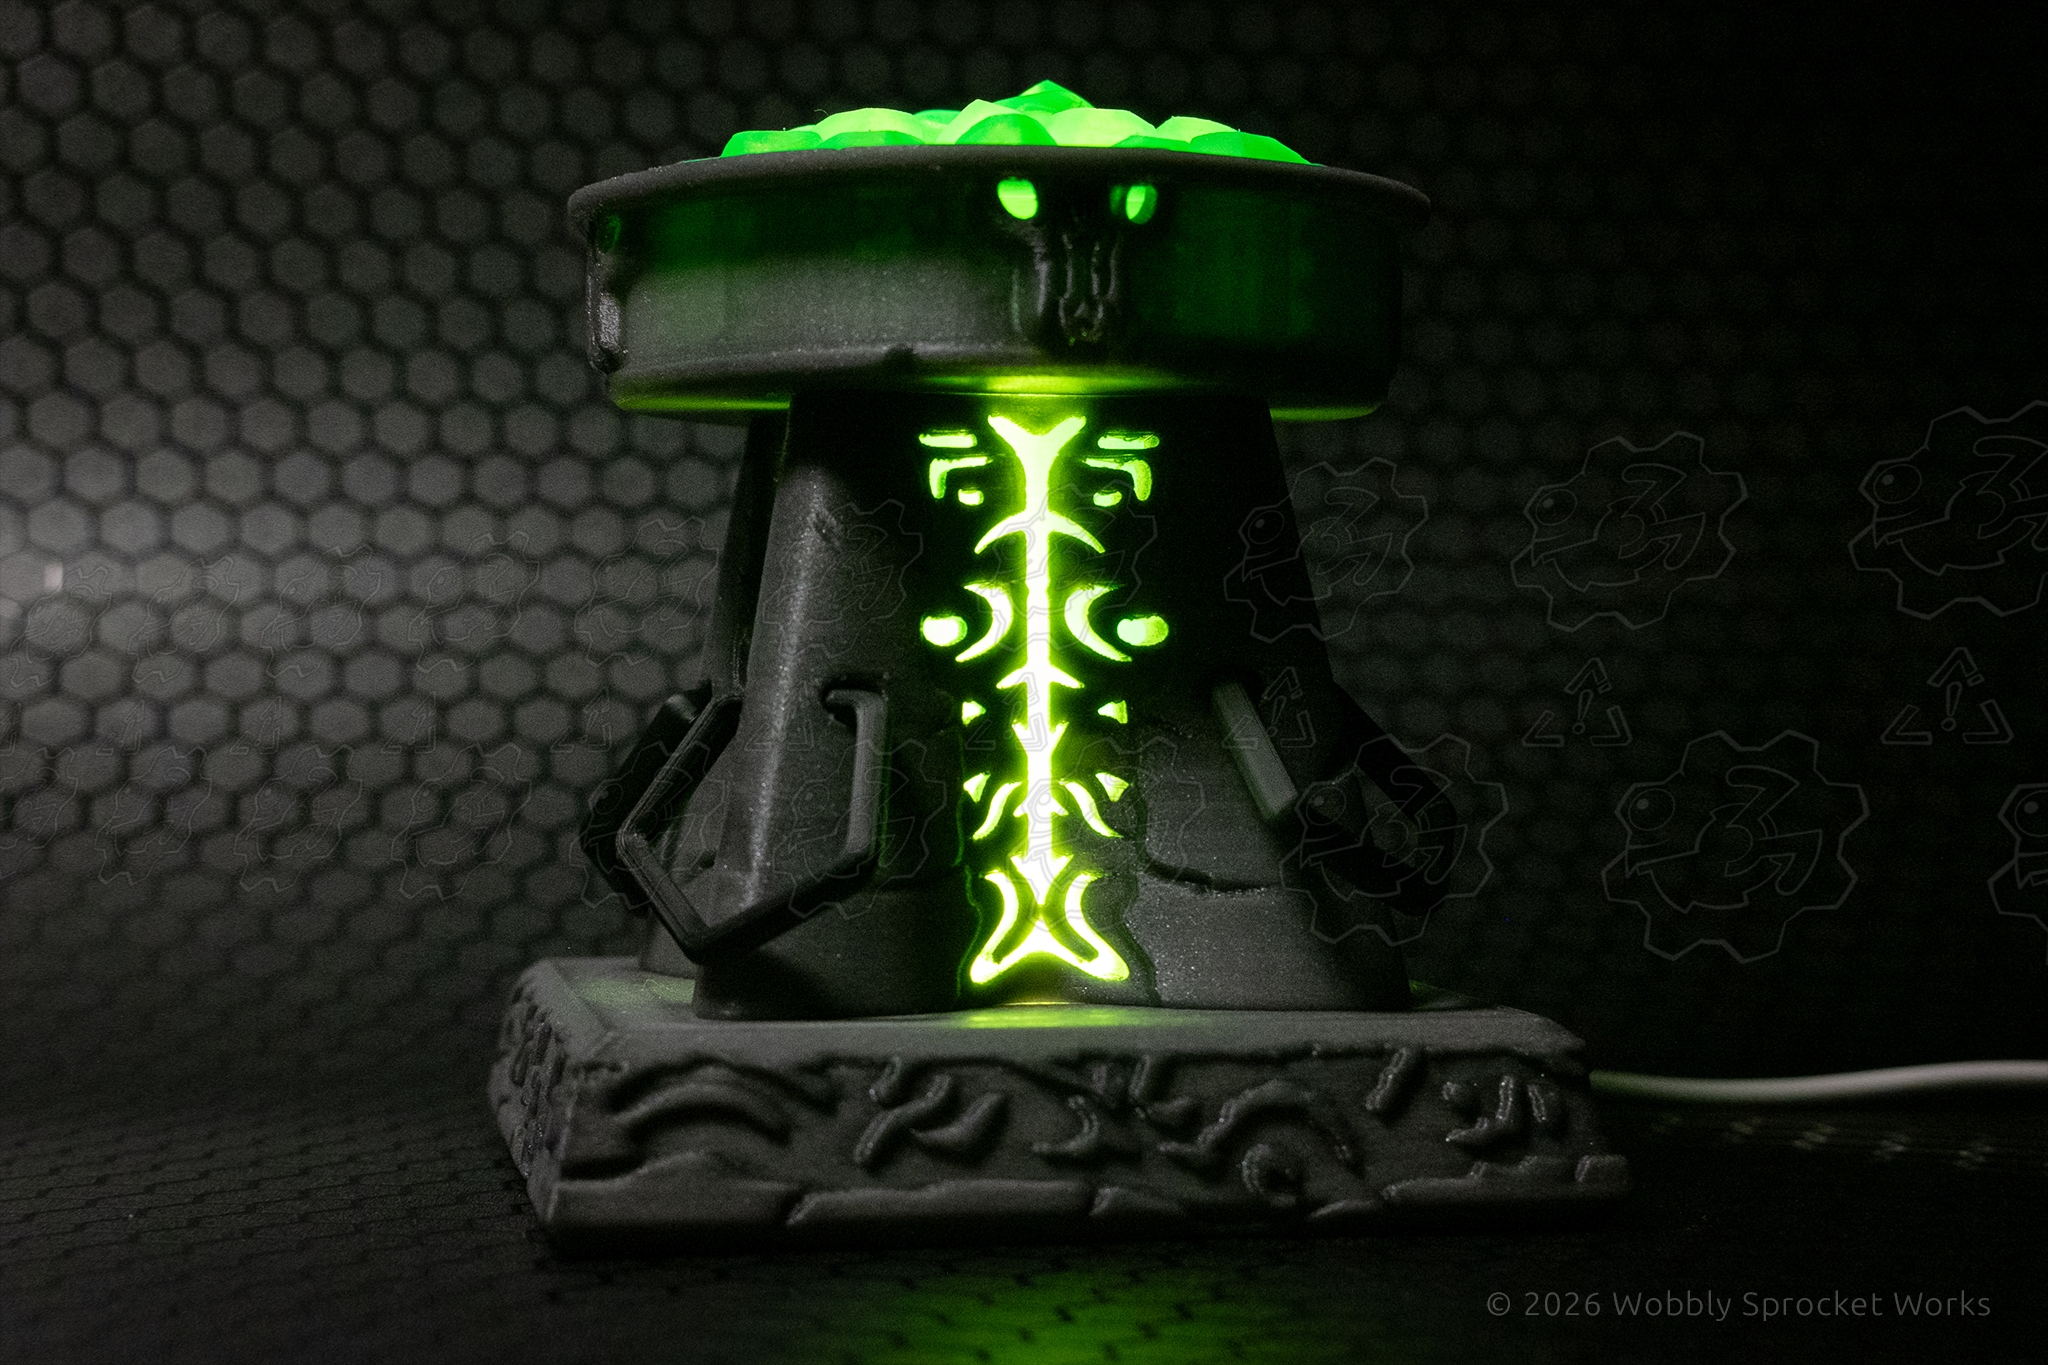
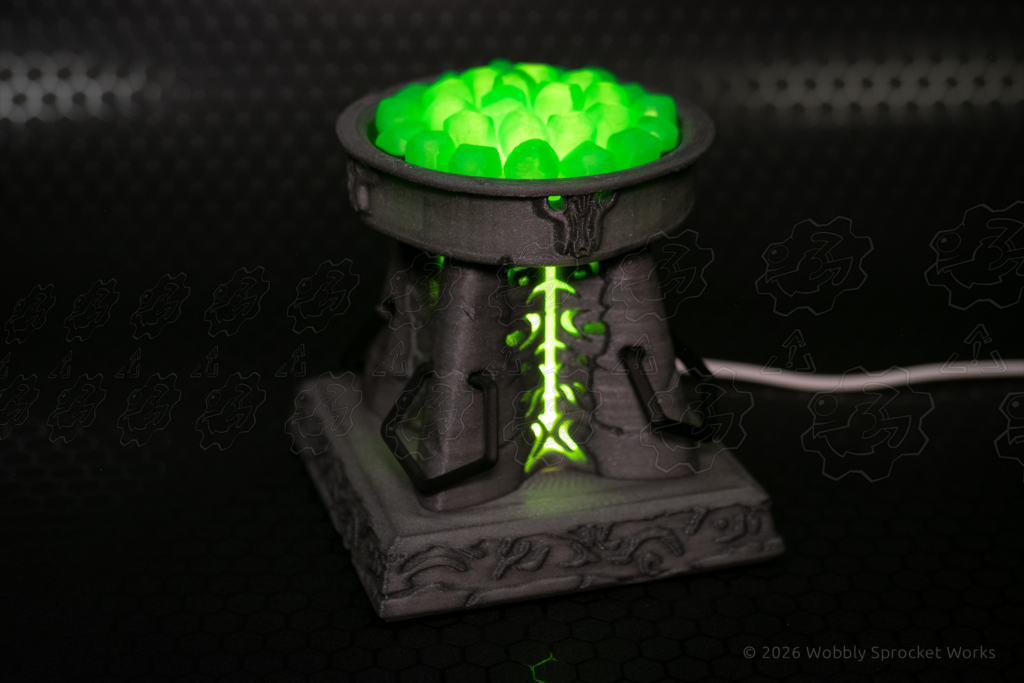
Desk lamp design inspired by the warlock’s soulwell spell in WoW.
Design Origin
I came up with the idea for this design way back when I was raiding in the Mists of Pandaria expansion, 14 years ago. Back then, I didn’t have the equipment or skillset to make it happen.
So, I figured it was about time.
Design Goals
- Must use the ubiquitous Bambu Lab LED Kit 001 style lamp (or one of its many clones) for the light source.
- Must allow dissipation of heat generated by the light source over the long term.
- Must be recognizable as a replica of the Warlock Spell it is inspired by.
- Must have little ‘lock rocks’ you can pick up and remove.
Design Process
Beginning with screenshots of WoWHead’s model viewer as reference images, I cobbled together a likeness with similar shapes and overall silhouette (with many, many more polygons). I separated the design into 3 main parts which were the base, the pedestal, and the bowl on top. It felt like I was designing a really weird bird bath.
As usual, I decided to connect the parts using screws. I always like my designs glue-less so they can be completely disassembled for cleaning, repair or modification and reassembled easily.
The pedestal’s shape is sort of interesting, as it’s a rounded 4-pointed star. The in-game model did this, and I used the thing for years but never noticed. I don’t know if there was a technical reason for it, but it’s near impossible to tell. Once I realized it wasn’t just a tapered square pedestal, I had to follow suit.
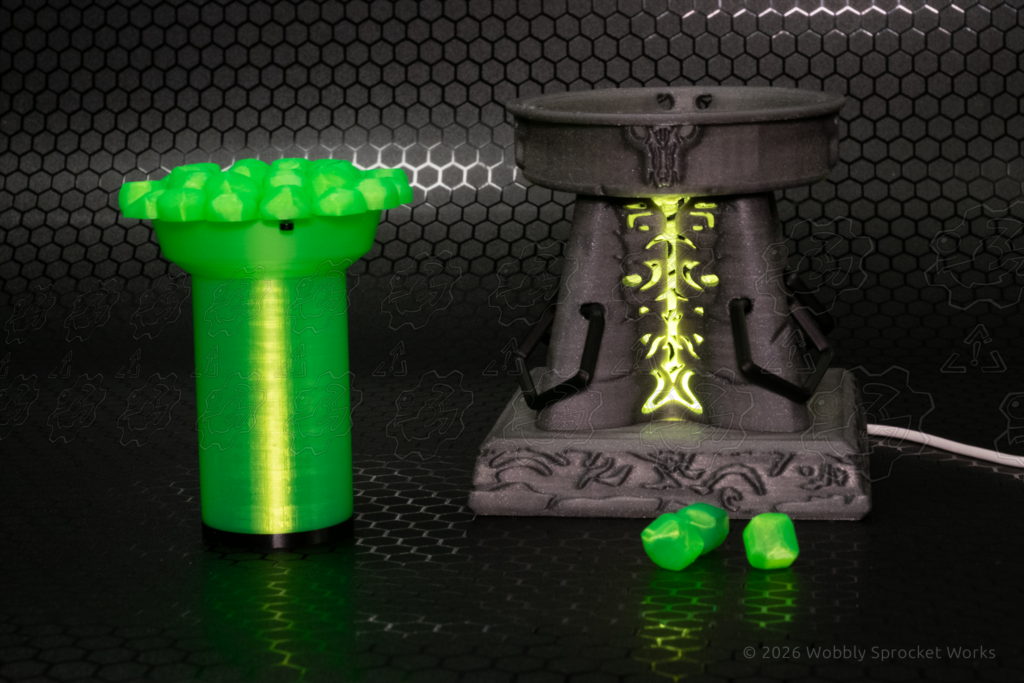
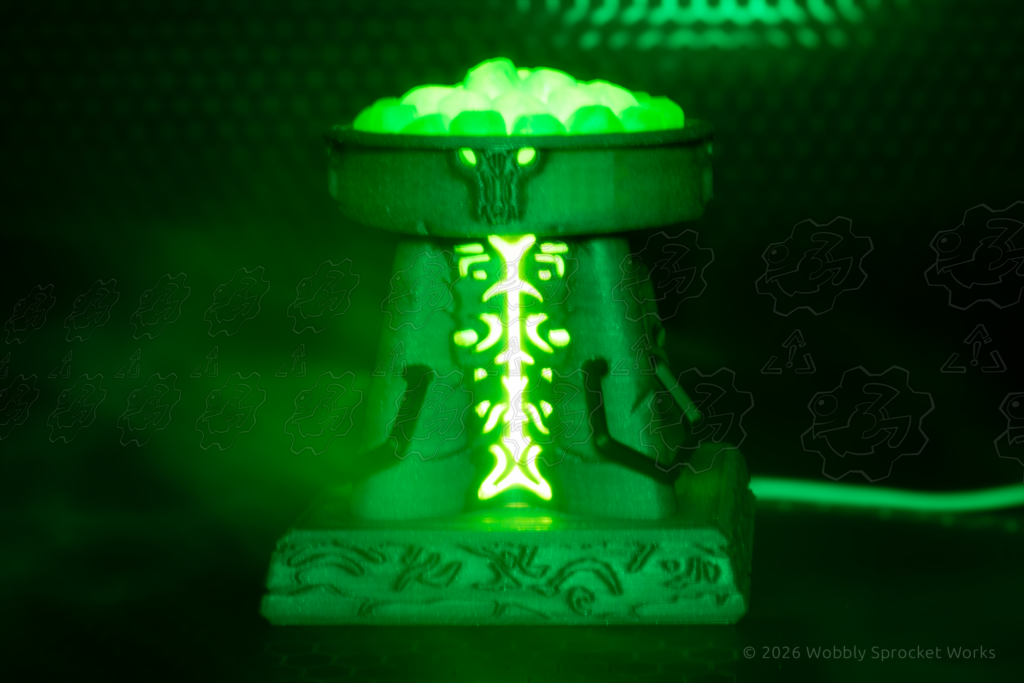
At some point, I realized how cool it would look if I cut out the engravings on the center of the pedestal entirely, letting the light shine through. This meant I needed a green tube inside to color the light, as well as act as a ‘light guide’ – helping it shine out through the cutouts which is basically a 90 degree bend.
It’s worth mentioning that my PC hated this design – something about lots of curvy lines being embossed onto already rounded objects made Fusion spank my CPU pretty mercilessly. It was getting pretty dang slow toward the end, with 10 second waits after everything I did.
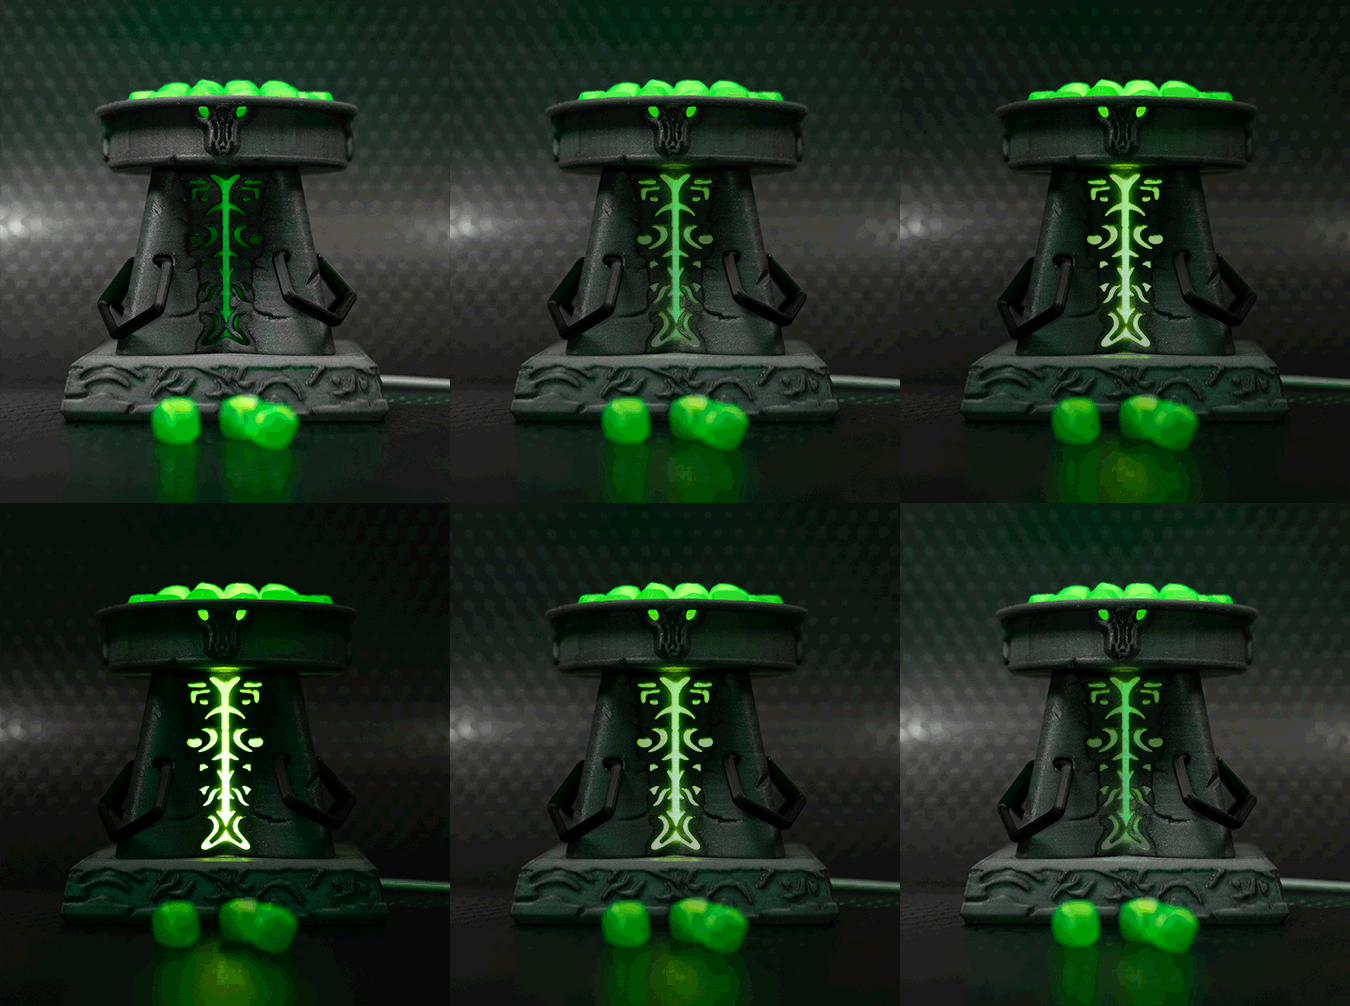
I tried a new trick for this design in order to lend it a bit more personality. I exported the model’s parts to another piece of software called Nomad Sculpt. As the name suggests, this software is for sculpting organic shapes to be used in animation, video game characters, etc, and it’s basically at the other end of the 3D modeling software spectrum.
I used Nomad to round off a lot of the sharp corners and edges which were left behind after modeling this in Fusion. Normally, I just use fillets to round things off within Fusion, but the more complexity I add with fillets, the more likely it will start refusing to calculate my attempts and generally I am left settling for something different than the rounded surfaces I wanted.
This model was absolutely covered in edges I wanted to round off, many of which were at weird angles and following sharp curves which would have given Fusion a conniption fit. So, I brought in the big guns and used 3D sculpting to make it happen. It took a few tutorials and some practice before I knew what I was doing, but I think this will be a nice tool to have in my bag from now on.
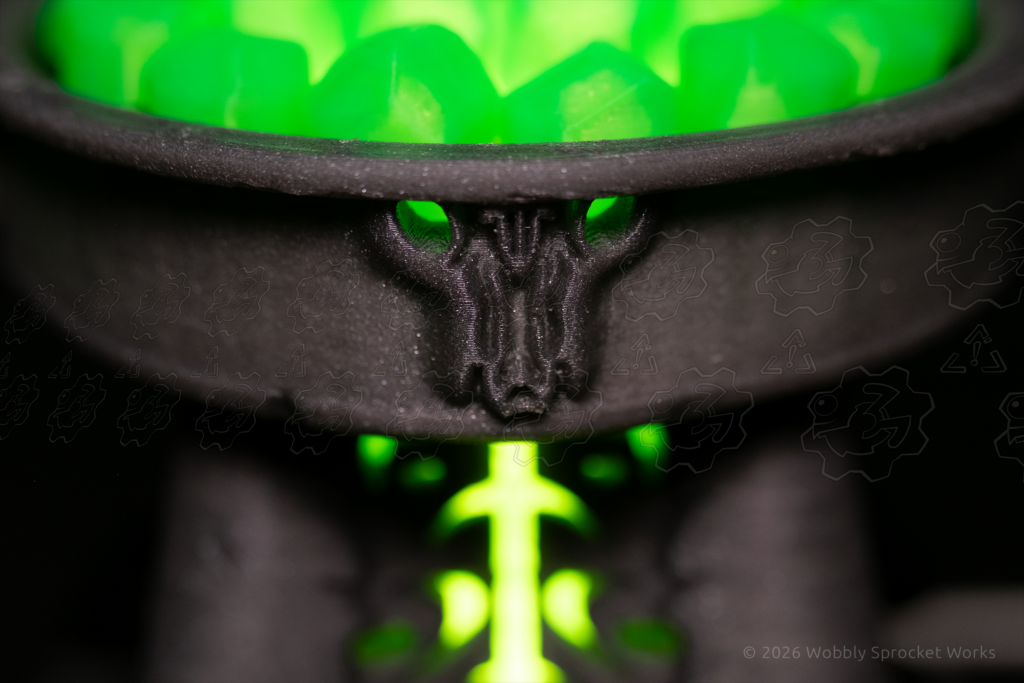
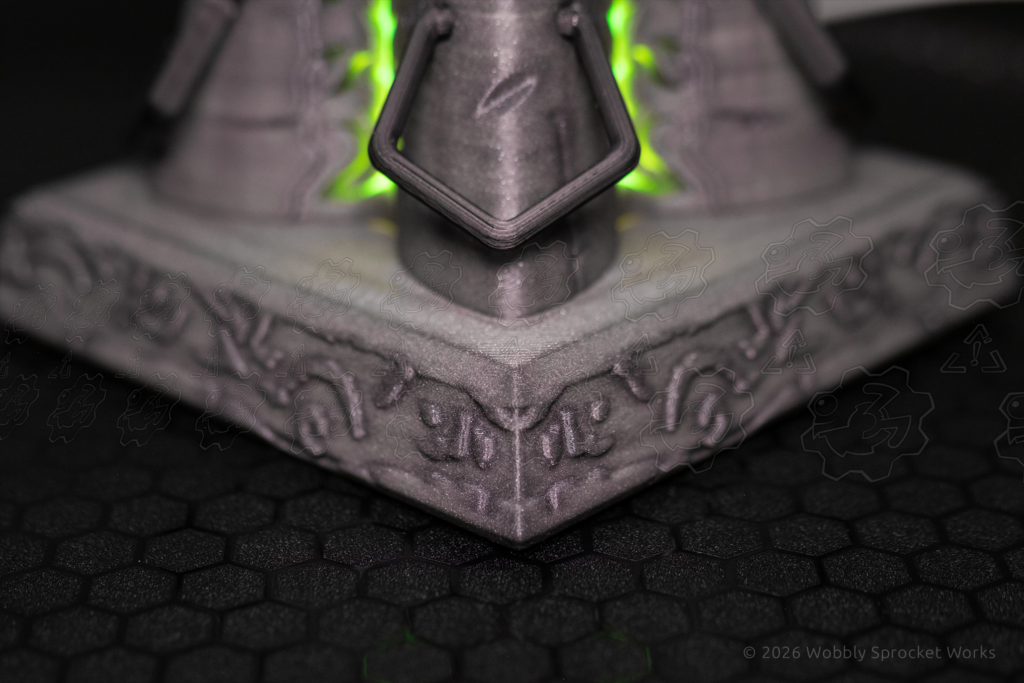
While I was at it, I added a bunch of cracks, chips and gouges all over the model for some added personality. The idea was to make it look like it could be made of old stone which was beginning to crumble.
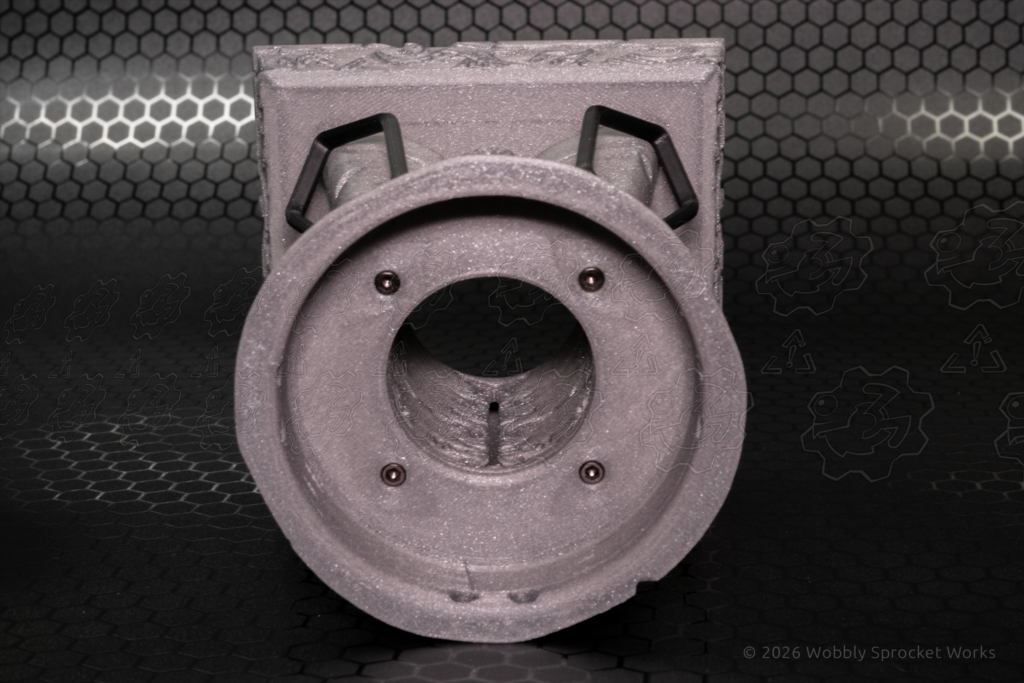
The rings on the corners of the pedestal are not closed – they have a break in them and are pretty flexible, so they can simply be bent open a bit, and the ends can be stuck in the pedestal’s holes.
For the bowl’s contents, my original idea was to fill it with my best approximation of 3D lock rocks. I designed some by starting with a few spheres, and slicing portions of them off at random angles. At this point they looked like odd shapes with some rounded areas and flat faces mixed all over them. Then I rotated them on multiple axes for a bit and combined two of the spheres into one shape. The resulting shape was no longer recognizable as having come from a sphere, and looked sort of like an uncut gemstone, which was what I was going for.
After some thought, I realized there were several reasons I should model a static pile of these lock rocks rather than just put a bunch of them in the bowl. Most importantly, the light would have a harder time shining through if it had to penetrate wall after wall while going through each rock in the pile. There is also the consideration of the user accidentally spilling the rocks everywhere – this would get annoying quickly.
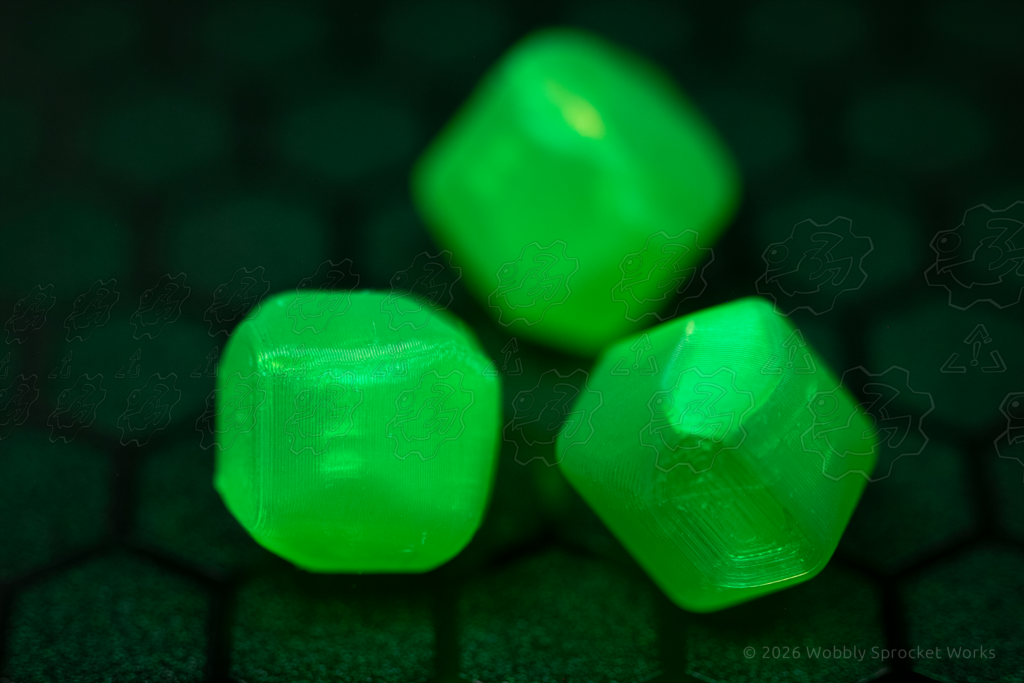
One of my design requirements is to be able to remove at least one of the rocks, so I decided to model the majority of the pile as a single part, leaving a smaller flat area in the middle designed to hold a few loose rocks. Once this was designed, I decided to attach it to the green light tube from the pedestal design, which would allow it to sit higher in the bowl and spread the upward beam of light out across as much of the rock pile as possible.
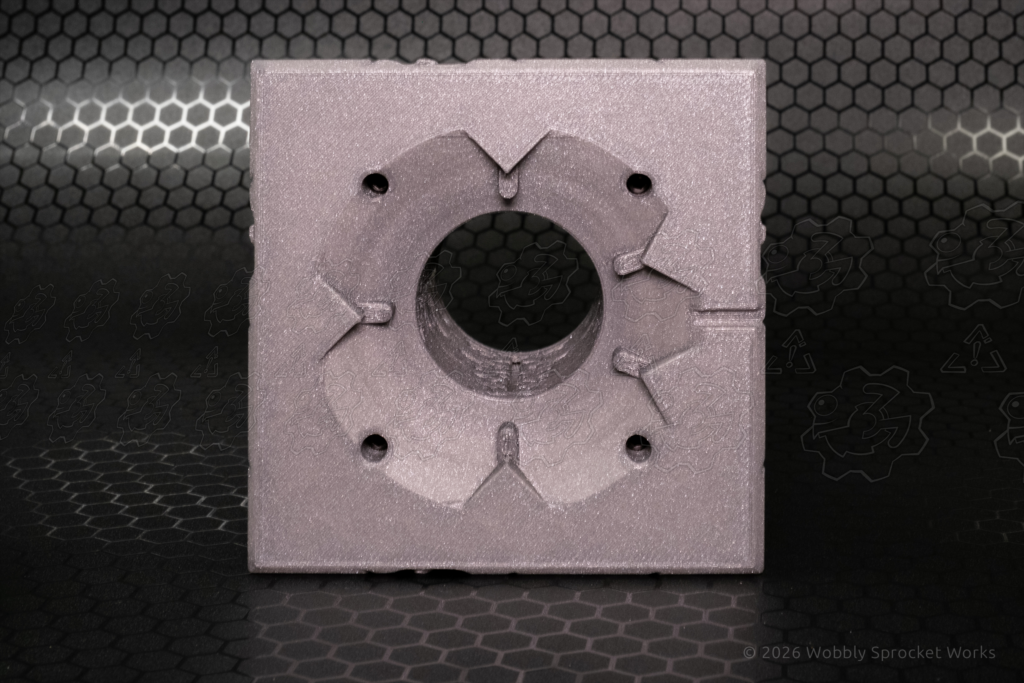
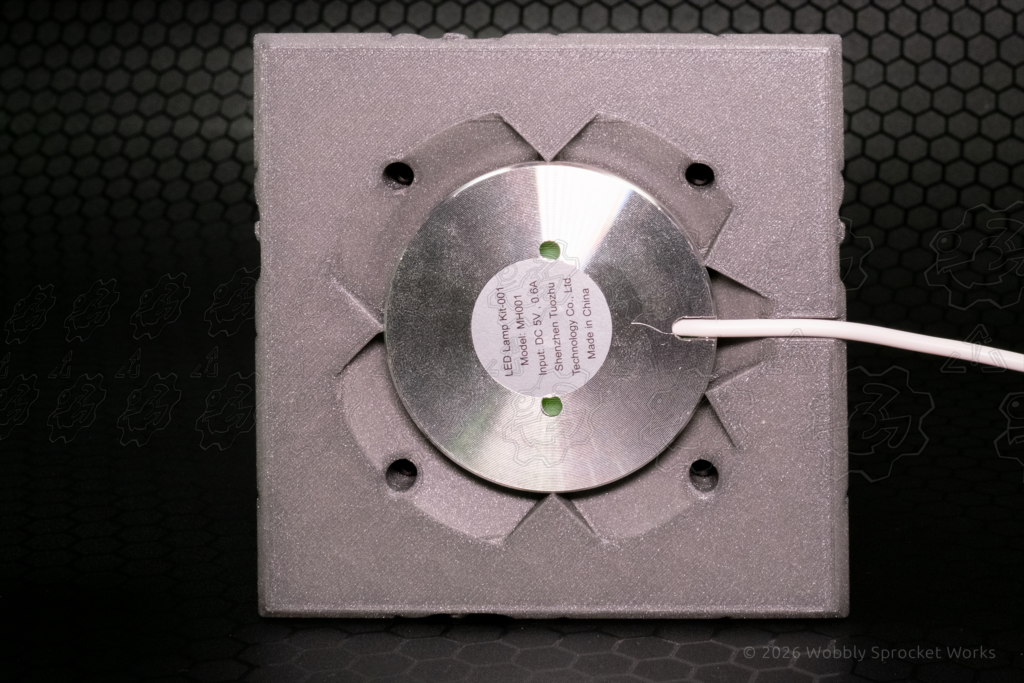
As for the base, I decided to go for a friction fit for the LED lamp. To that end, I took the LED lamp apart and measured everything with my digital calipers, including the PCB and even the components on it. I then recreated it in its own model. I did the extra work because I wanted a really accurate 3D model of the LED 001 lamp itself, so it can be reused to design future lamps.
Since I had the dimensions of it now, I decided to include a green diffuser to replace the white one which comes installed in the lamp. This would ensure all light coming out of the lamp was that nice warlock green.
Now that I had the dimensions of the LED lamp, I created a cutout in the base for it. I didn’t want to insulate the lamp too much with a bunch of plastic, because I wanted to allow the aluminum housing to radiate heat generated by the LED’s inside. These lamps can get pretty warm (uncomfortable to touch, but not able to burn), but much less so if they are able to radiate.
I came up with a design that only touches the LED lamp around its perimeter at 5 small points, and the rest of the LED lamp’s housing touches nothing but air, allowing airflow to pass all around it. The idea is that this will result in this design acting like a heat chimney – the LED lamp heats the surrounding air, which rises up through the pedestal and out of the bowl, pulling cooler air in through the bottom.
Manufacturing Process
I decided to use a rather unique new filament for my prototype (which is what is pictured), which claims to be reflective due to glass micro beads included within. I was pretty excited about the idea of being able to print reflective parts, but it turned out that this filament was… not reflective at all, in my experience. As a result, the roll sat in one of my airtight filament storage bins until I could figure out what to use it for. Since I needed a stone-like color for this build, I decided to bust it out.
The reason I mention this filament here is that I won’t always be producing this model using it. Once I run out of this roll, I plan to switch to a different grey filament for future builds, and my product pictures will be updated to accurately show the filament I use. The price of special reflective filament is much higher than regular high quality grey filament. While the stuff is pretty neat, I don’t think it adds enough of anything noticeable over normal grey filament to justify the higher price.
Due to how fussy the Fusion software was when producing the initial models for this design, I already felt like the project was a bit of a problem child. I was happily surprised when the grey parts of the design printed very nicely using my initial slicer settings. I was also pleased that the smoothing I did in Nomad Sculpt printed well, as this was my first time seeing the results of that experiment. The only part I had trouble printing was the pile-of-rocks for the bowl, printed using my go-to translucent/fluorescent green PLA.
This print was failing spectacularly, with giant holes and areas where it seemed like the filament failed to be extruded entirely. The slicer settings I chose for this were not kind to my printer – I was asking a lot of it. This is because I used as little infill as possible, made the walls as thin as possible, and the model includes dome-like shapes without supports to aid in holding them up. This was because this part needed to transmit as much light through it as possible, and being translucent, any support marks or infill would be very noticeable.
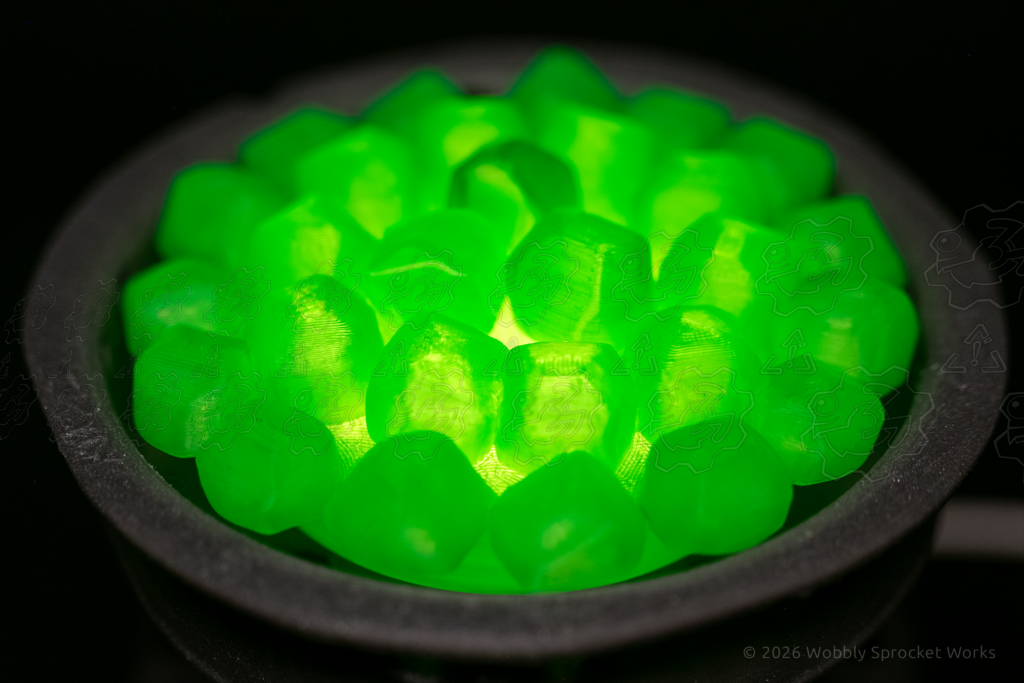
I had to reprint that part 6 times, trying different slicer settings the first 3 attempts with no real improvement. On attempt 4, I was running out of ideas, so I dried the filament roll for a few hours beforehand, and the print improved a bit. Seeing this, I knew I was on the right track and I dried the roll for 12 hours. I then tossed all my settings changes from the last 4 attempts away, trying again with my original settings and dry filament.
That was attempt 5 and it came out almost perfect, but one problematic area still had a hole in it. I strategically tweaked a couple of settings by a small amount to give that last problem area some support, and I finally had a nice looking translucent pile-of-rocks.
I am in Georgia, and it’s pretty humid here almost year round. I go to a lot of trouble to keep my filament dry in storage, but somehow I let that roll take on a bunch of moisture. It did spend about a week sitting in my AMS Lite which has been retrofitted with an enclosure, but the seal isn’t perfect. In fact, I printed the AMS Lite enclosure’s lids out of this same filament – it’s one of my favorites. Normally, I let filaments cook in the dryer for a while after they spend substantial time in the AMS Lite, but the dryer may have been occupied that time.
I didn’t run into any issues with assembly. 4x M3 screws fasten the pedestal onto the base, and another 4x M3’s fasten the bowl onto the pedestal. The green light tube attaches to the pile-of-rocks with 2x M2 screws, which are technically not even necessary but they keep everything a little more stable in cases where the lamp is picked up. The green diffuser is installed in the LED light, then it is press-fit into the bottom of the base. There is a small channel for the LED’s cord to pass through in the base.
I made the screw holes on this design far deeper than they needed to be. They can accept any screw length from 6mm to 24mm. I do this whenever I can so that I can use any screw length I have on hand, thus avoiding delays if I happen to run out of a given size.
Testing Process
To test this design, I used the lamp every day for a couple of weeks. I left it on for 12 hours straight inside a building with central AC and then again in a hot garage. After that, I turned it on for about 6 hours each evening.
I was mainly watching for any signs of the PLA softening due to heat generated by the LED. I was also watching for any signs of the LED light having issues of its own, so I tried giving it a variety of power sources.
I ran it off of a USB power bank, an AC power strip with a USB port, a Windows PC’s USB port, and an AC plug-in USB charger. Each of these was used for at least 6 hours straight.
I am glad to report no observed issues.
Closing Thoughts
This design is an ode to all the Warlocks in Azeroth who dutifully drop a soul well before every pull in the raid. Now we can have a lock rock when we really need one – while dealing with boss creatures on Earth!
Thank you for reading!


