
Summary
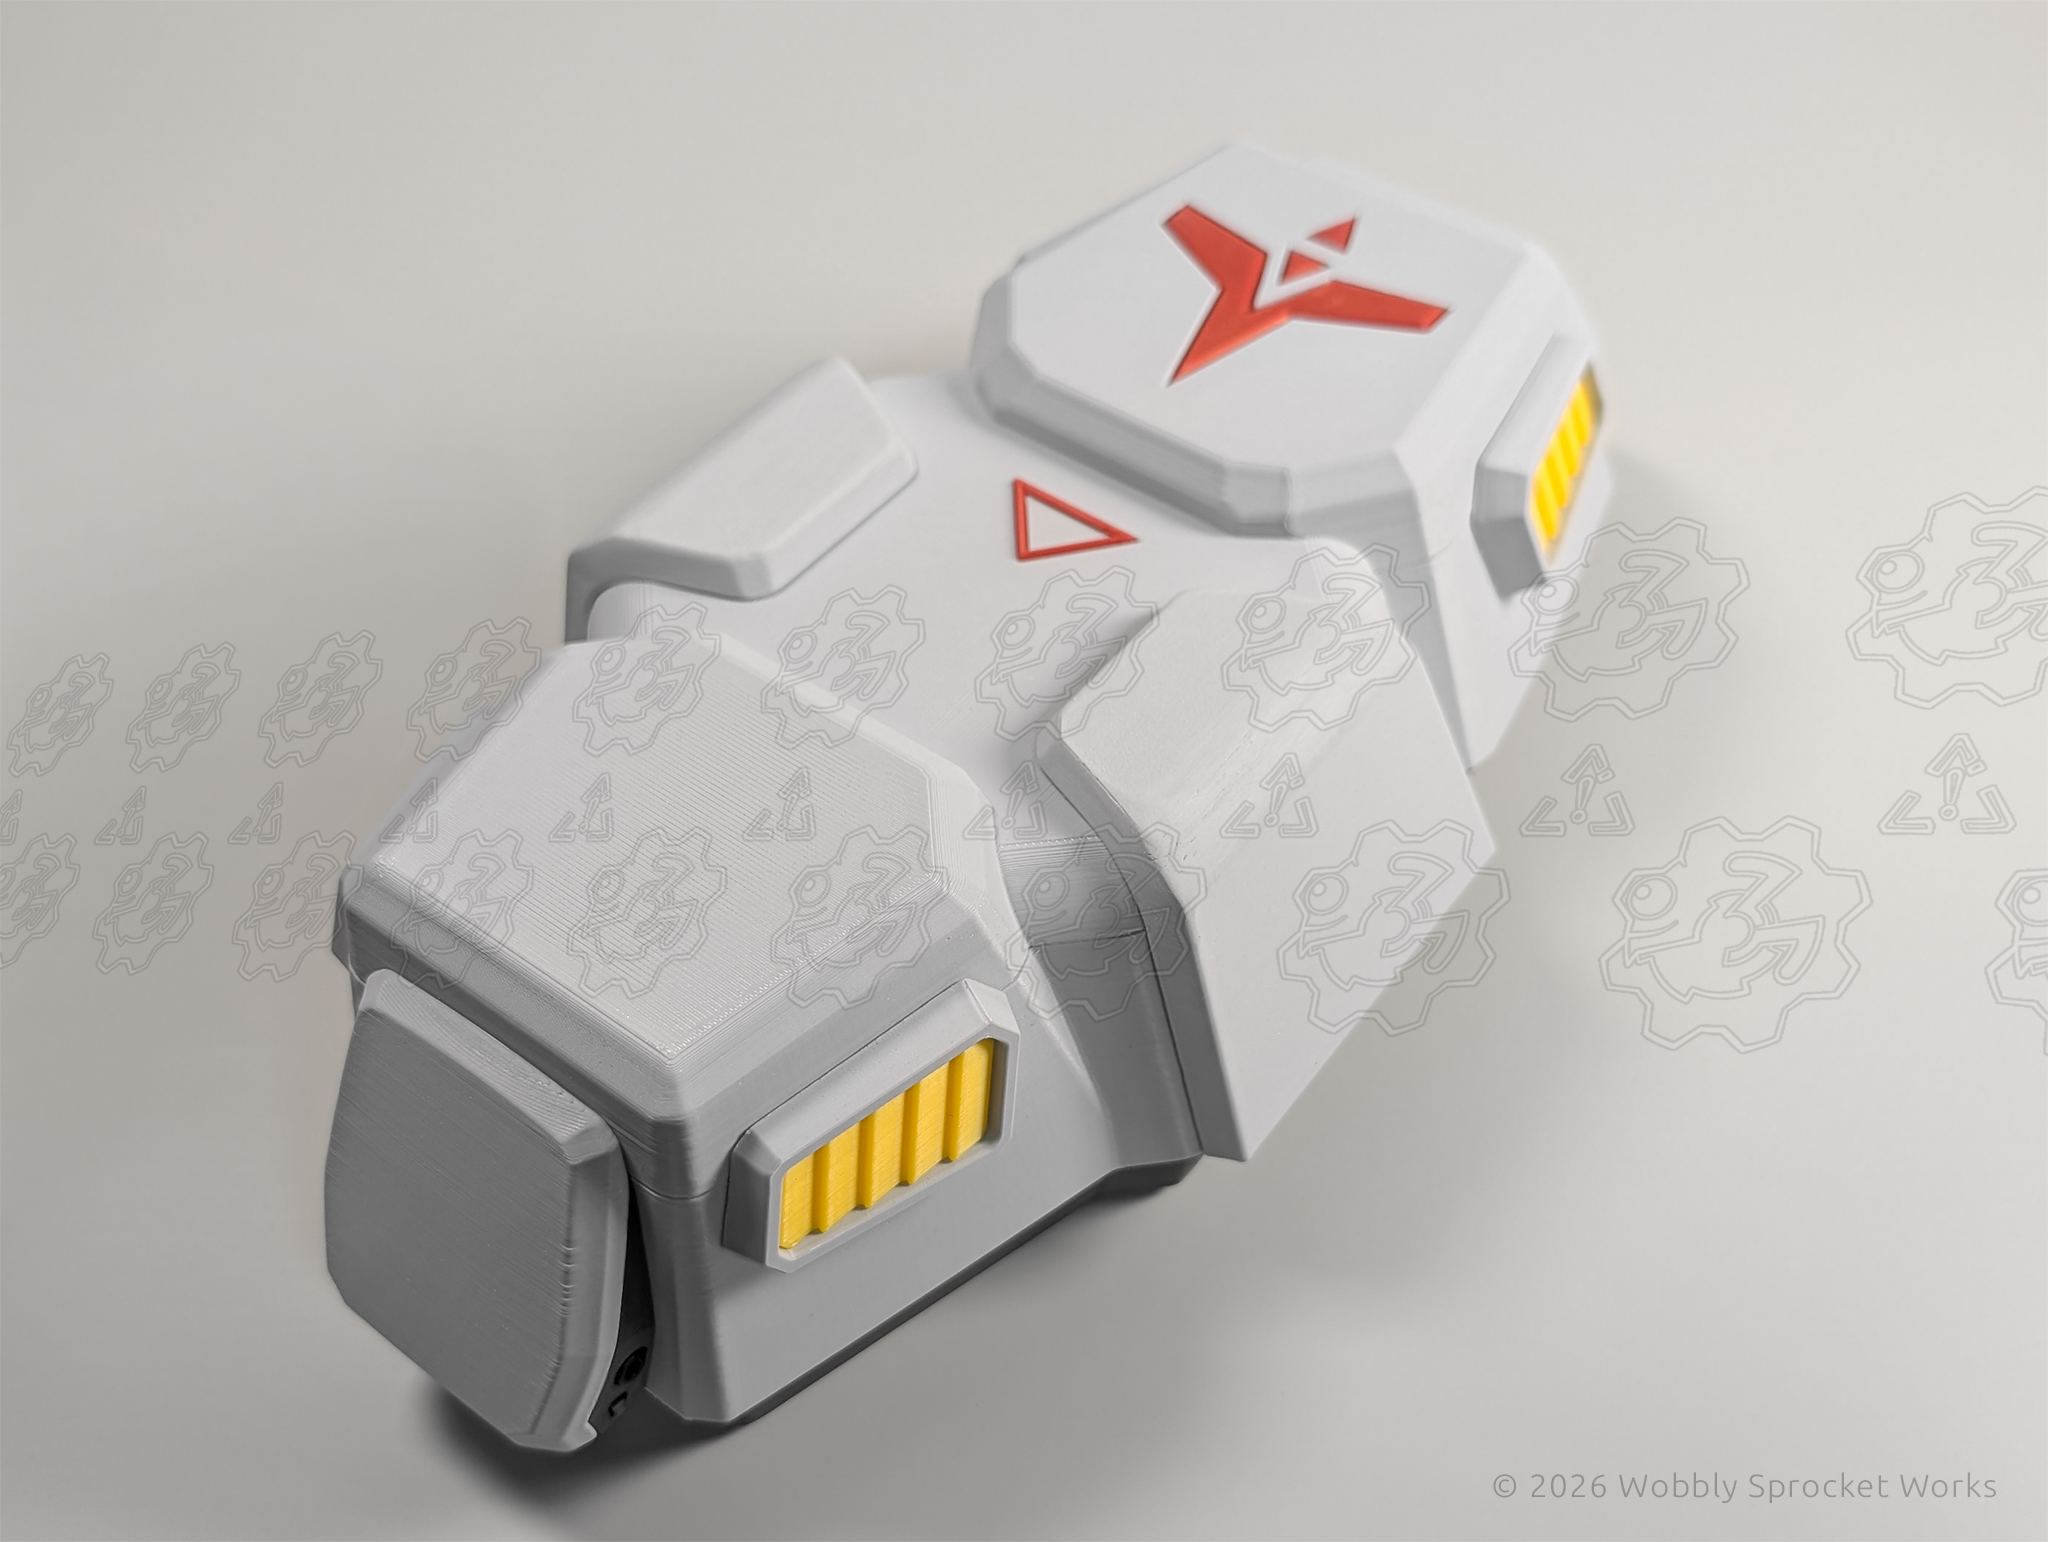
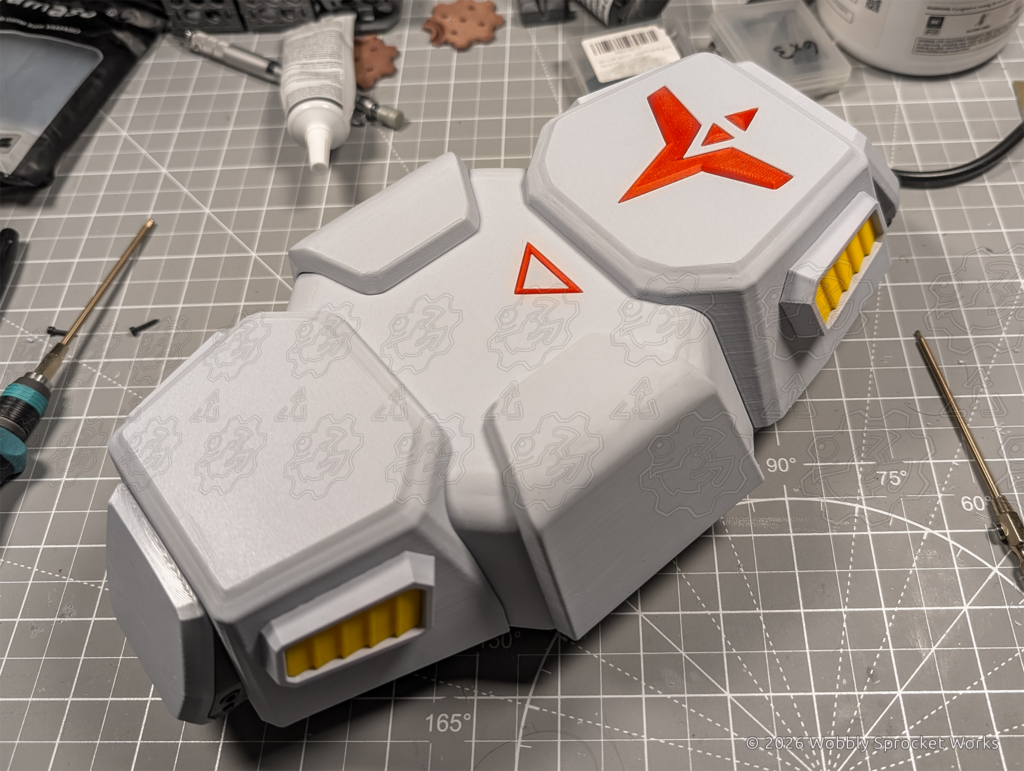
A Gundam shield deck box for for trading card gamers.
Design Origin
A friend of mine who is pretty heavily into the new Gundam trading card game asked me to design a deck box for him which looked like a Gundam’s shield.
For those who don’t know, Gundam is an popular anime franchise which has been around since 1979. It features giant, sometimes humanoid mechs which are piloted by people. DIY model kits featuring these mecha are popular all over the world, as well.
Purpose / Goals
Deck boxes are generally used by trading card gamers to transport their cards to and from events, such as tournaments or playing with friends.
Most of these games (for example, Magic: The Gathering) require players to strategically build their own deck from a very large selection of possible cards, and they prepare multiple decks beforehand so that they can just grab one and play. This means a deck box needs to keep the decks separated.
Many of these good folks make an effort to keep their cards in good condition. Each card is kept inside of a thin plastic sleeve while the entire deck is kept in some sort of protective box in order to keep the cards protected.
So, my goals for this project were:
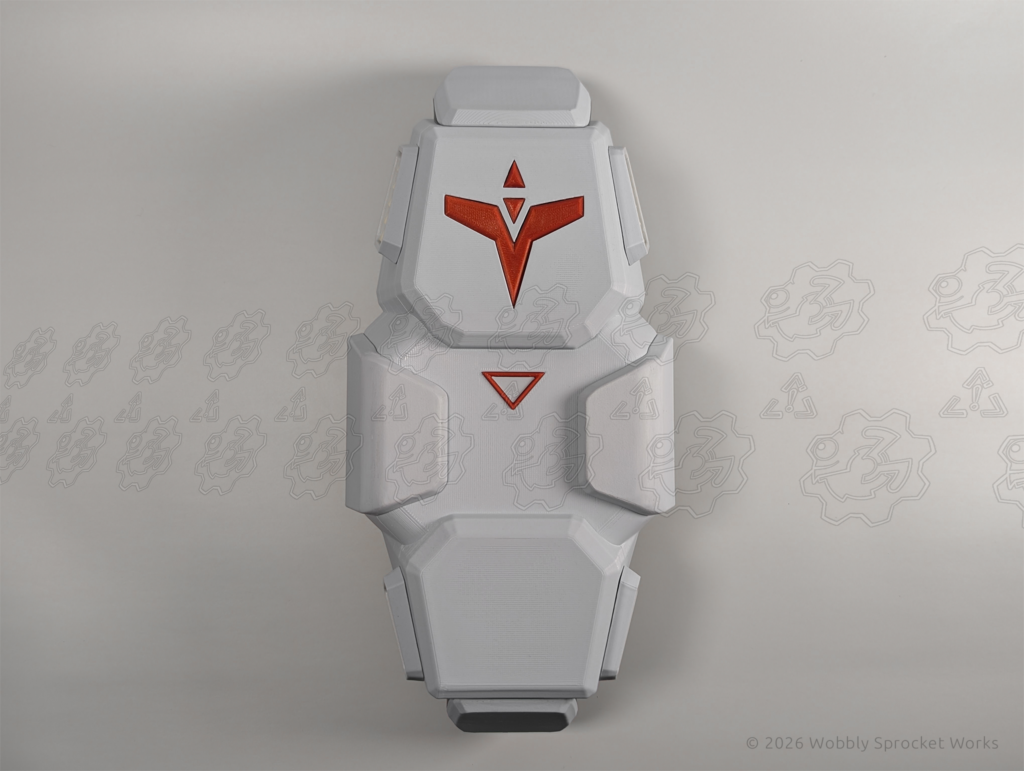
- Needs to be recognizable as a Gundam shield
- Needs to hold multiple decks while keeping them separate
- Needs to have room for most standard card sleeves to fit
- Needs to protect the cards and close securely
Design Process
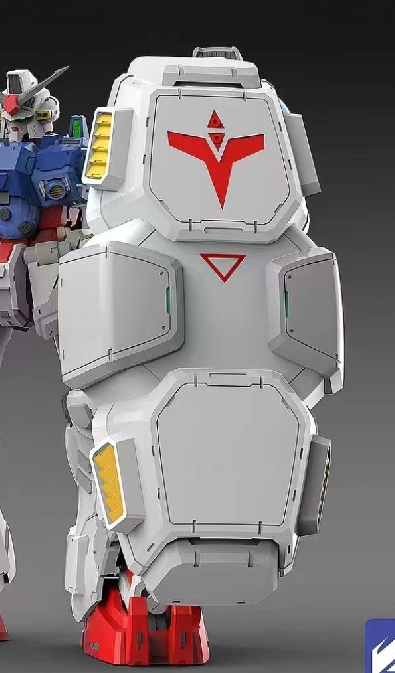
Now I love me some giant robots, but I don’t know a lot of details about the Gundam world. I had to look around for a suitable shield to use as the basis for this design. Luckily, the plethora of available model kits provided a great way to shop around for one.
I saw several I liked, but I was having trouble deciding how I’d turn most of them into a box, unless it was just a box with a shield on the front. To be fair, that idea could turn out very cool – but I already knew I wanted the box to look like a shield.
And then I found Mr. Physalis and his shield, which looks cool but importantly, somewhat resembles a big mechanical coffin. And.. we had a winner.
I found several pictures of that shield from different angles, and as I took a look at the details, I was a bit daunted. Let me explain that at this point in the 3D modeling journey, I had only really designed shapes which were built from flat planes and straight lines, and then if desired the corners were rounded off using the good ol’ fillet command until Fusion decided it had had enough of that nonsense and threw an error.
My hat’s off to the people who design Gundams. If you look closely, there are almost zero straight lines on a Gundam. Typically, the armor panels curve in two or three dimensions in most cases. This gives them a really interesting blend of mechanical robots which pull off a very organic look, and in my opinion, it looks fantastic.
However, while I tried to replicate the look of some of those panels, I had a tough time at first. I ended up fully redesigning most portions of this deck box at least once, as I realized “oh, that piece is also curved from THAT perspective”, came up with a different crazy sequence of boolean cuts and tried again.
To this day, I am still not completely satisfied with the results I got. I also have no idea what sort of modeling tools the Gundam artists use – I am going to guess they actually sculpt them, though – as in, with a 3D sculpting tool meant for making organic shapes. I came to that conclusion because while I could get close in Fusion, I couldn’t get it perfect and I think that’s because Fusion is an ‘engineering’ 3D modeling tool. It wants to make flat panels and straight lines. It goes out of its way to help you make them that way, and if you refuse, it doesn’t appreciate it very much.
I think if I tried a Gundam style design again with my current level of knowledge in Fusion, and I tried stepping into surface modeling territory (which I didn’t know anything about back then), I could make a better attempt. I think with those surface tools and possibly exporting the results into Nomad Sculpt (a 3D sculpting app) to round off the edges, I could get pretty dang close to where I want to be. I look forward to that challenge someday.
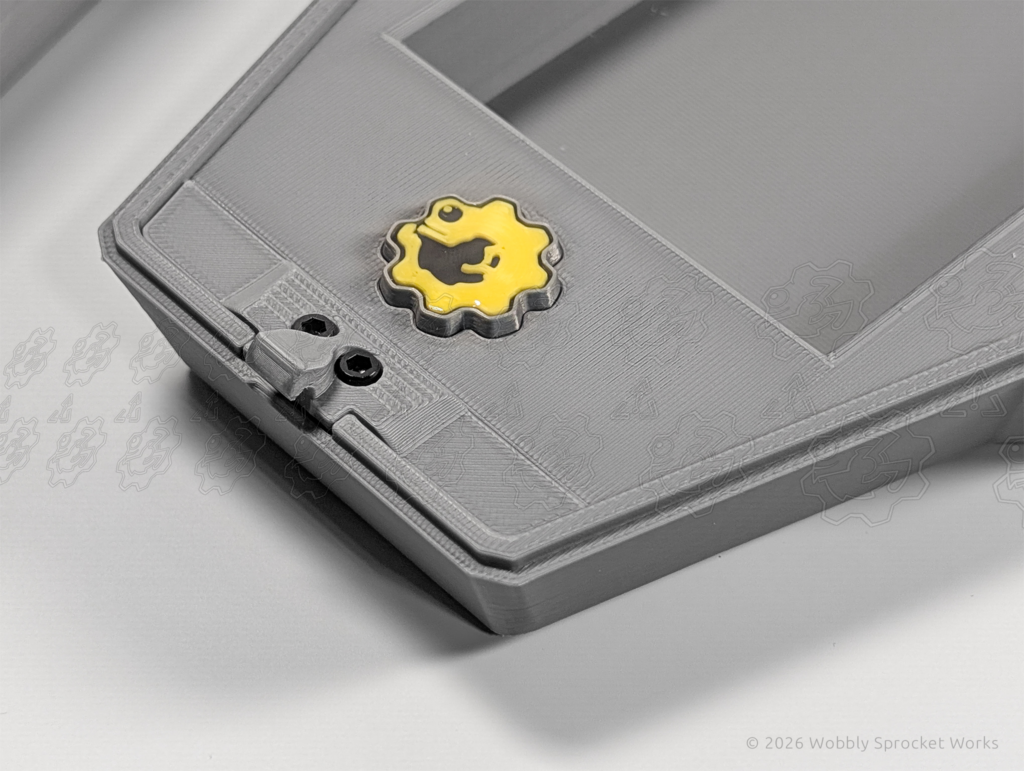
I started with the most difficult part first, and designed the armor panels on top of the lid. After I had those sorted out, I hollowed out the lid and designed a base for it to sit on. This was straightforward, as it just needed to fit within the lid and taper down a bit as you went lower.
At this point, I did a bit of research to find out how many cards are in a Gundam TCG deck, the exact dimensions of the cards, and how large the most widely used types of card sleeves are.
I then modeled a ‘dummy deck’ so I could start seeing how many decks I could fit into this box at its current size, and immediately saw a problem. While the shield I chose is box shaped in general, it does not have proportions which match up with a deck of cards very well at all. The shield is relatively tall and skinny, and gets skinnier at certain points, which meant it was too skinny to fit the width of a card deck.
Note:
When I was nearly finished with the design, I figured out I could make a ‘chibi’ looking version of this box where the shield is shorter and wider, and that it would fit a single deck while not being too much larger than the card deck itself. Something to do in the future!
I tried every orientation of the deck inside, including having the deck sit at different angles. This is when I discovered that the box was not deep enough to hold a card deck sitting on its side, either. Sometimes, things just don’t want to come together. All we can do is work with what we’ve got, accept the consequences and then mitigate them where possible.
After scaling the entire box up a ways, I was able to fit a deck in it, but the box had to be much bigger than the deck itself, with a lot of wasted space which was too narrow to be useful for card storage.
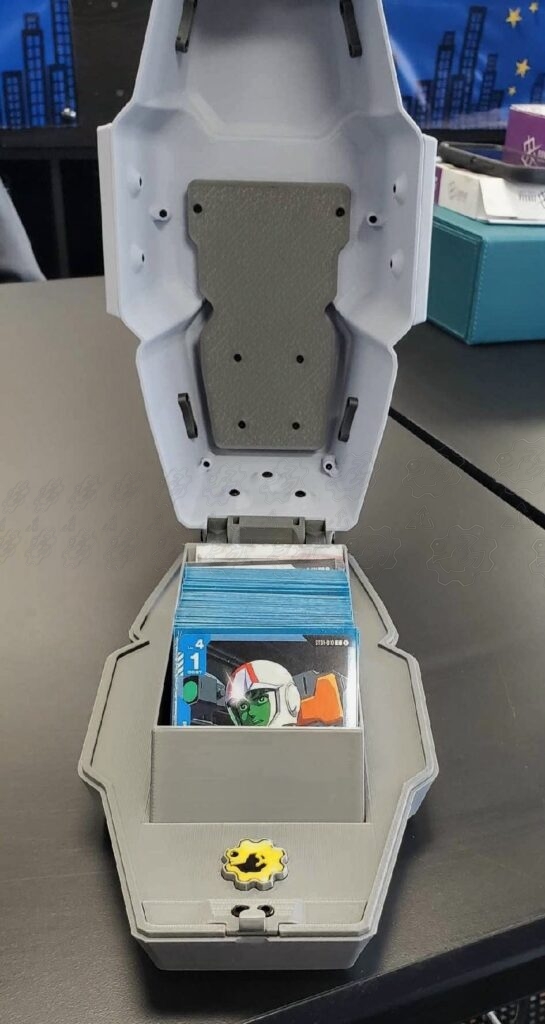
I decided that if I was going to make this thing so big, I might as well go slightly bigger and make it hold two decks. I decided that the most efficient way to to this was to put the decks in single file and lean them back at an angle. It still resulted in a deck box roughly the size of a regulation football, but at least it could carry two decks and look cool doing it, which was sort of the point.
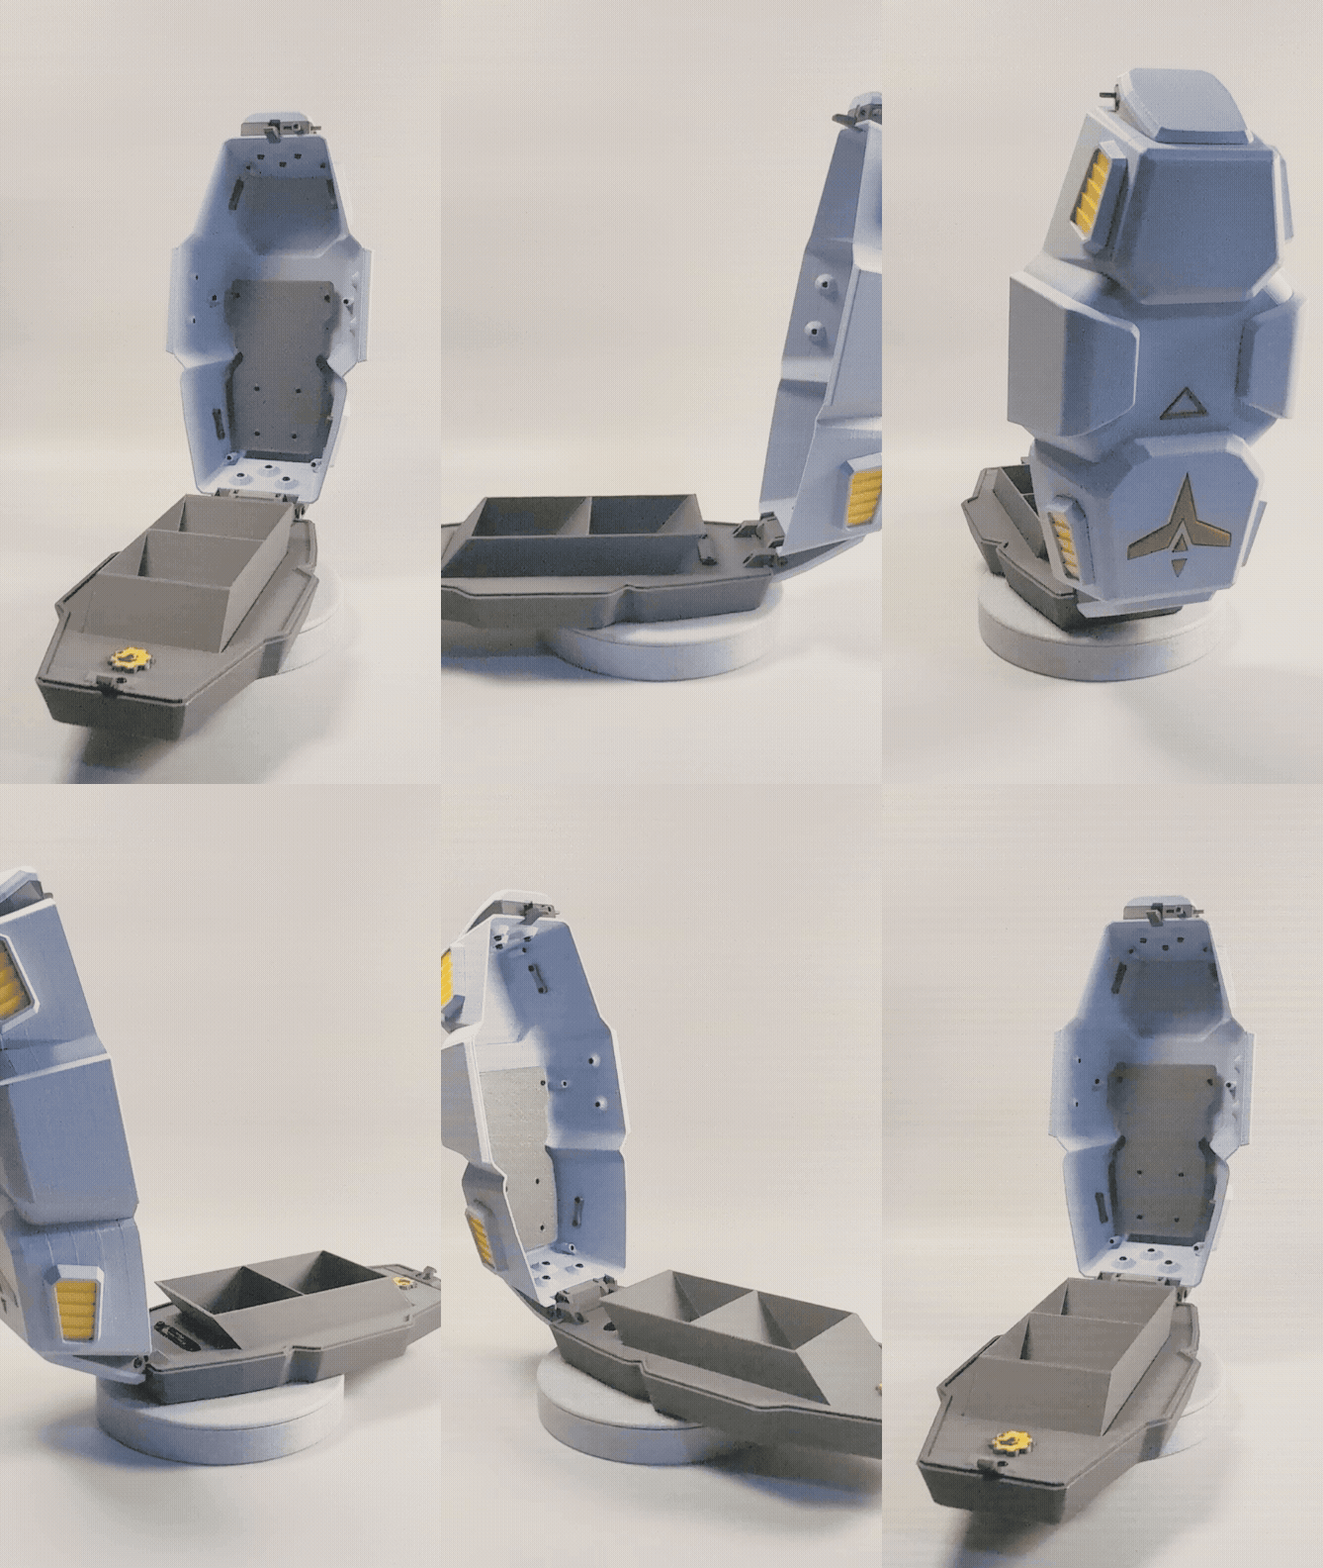
Once the overall dimensions of the lid and base were settled, I could start on the details of making this thing work like a latching case. It needed a hinge, and I wanted to have at least one ‘stop’ which would hold the lid upright and not just go flopping 100% open. Think about the way a car door stops at say, 60% open, then 80% open before opening all the way. They do this because they have detents in the hinges designed for that purpose.
I did the same thing here, using ball spring detents which drop into holes every so often as the lid rotates open, thereby holding it in place. The hinge pin itself is two M3 machine screws which thread into captive nuts. The hinge connects two ‘legs’ to the lid, and those legs are designed to extend downward about an inch into the base of the box and are screwed in, to anchor the hinge to the base. All of this is built into the armor panel at the top end of the box, which is attached to the lid shell with three M3 screws.
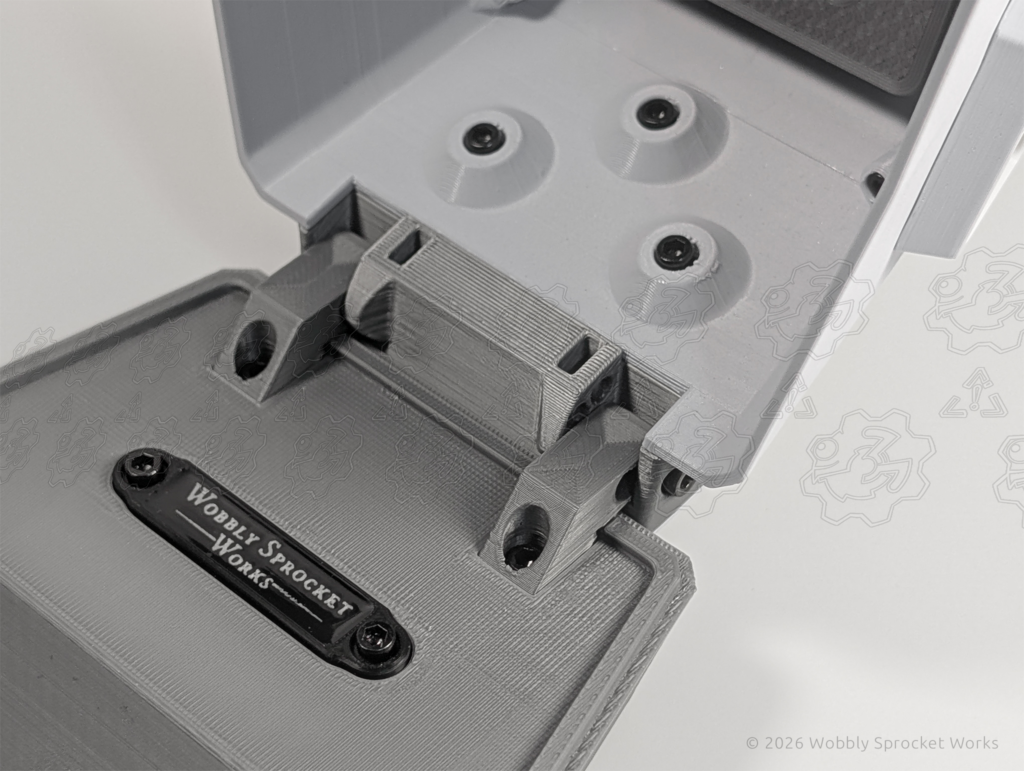
Now the box needed a method of latching shut. I wanted this to be as simple as pushing the lid closed, and the latch would catch and hold the lid securely shut. The latch needed a spring which would hold it in position but allow the latch to move outward when it encountered the catch piece it locks onto. I used opposing magnets for the spring because I like the feel of them, they are quiet, and honestly I am not sure how I would have fit a metal spring into this spot anyhow.
The latch was a part of the design which gave me some trouble. I kept almost getting it right, then it would fail to latch every so often, or the latch would prove to be able to open unintentionally when putting different directional stresses on the lid (I tested this on purpose).
I had about 7 iterations on that latch and the corresponding part for it to catch on before it latched every time when the box closed, and stayed latched while the box was being abused. I took this seriously, because I didn’t want my box dumping my friend’s cards all over a parking lot someplace.
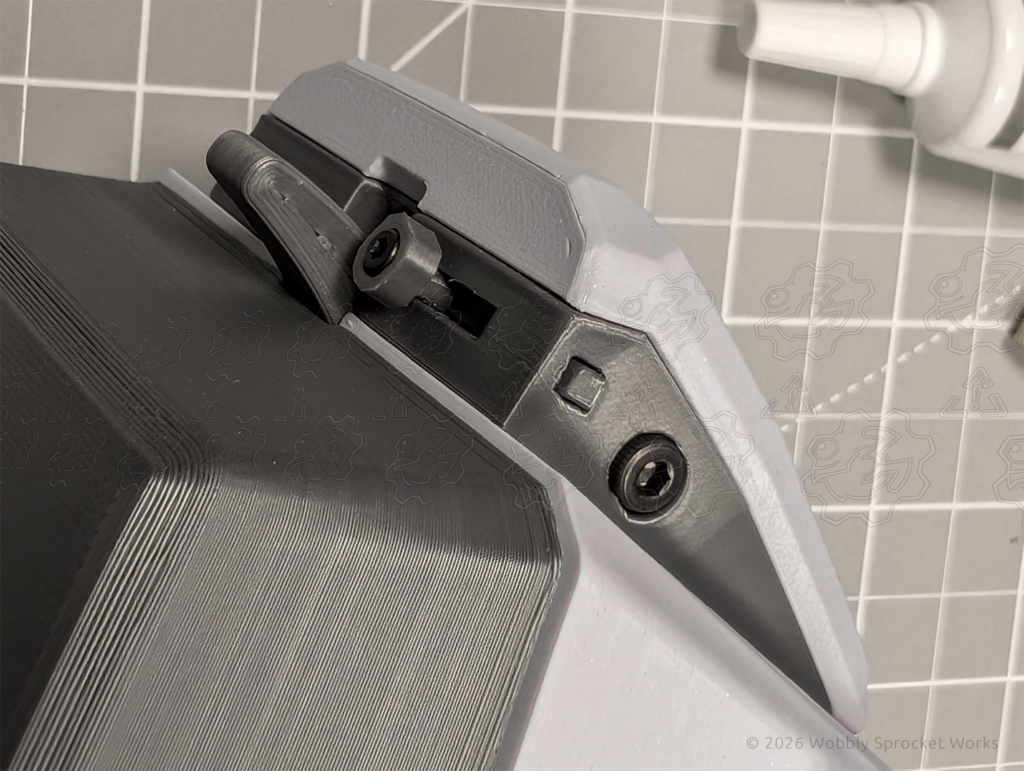
After the latch was squared away and working, I decided the next most likely problem to occur would be accidentally unlatching the box while carrying it. I added a sliding ‘lock’ to prevent this, making opening the box a 2-step process of sliding the lock, then pulling on the little latch lever. I had very little space to work with and the parts for the lock approach the lower size limit of what a 0.4 mm nozzle can effectively handle.
Both the latch and the lock are built into the ‘armor’ panel on the bottom end of the deck box, much like the hinge was for the other end.
While I was modeling the ‘cubbies’ in the base for the individual decks, I figured I might as well make a tray of sorts which was removeable. Then, I could supply an extra tray and that way, my friend could have 4 decks ready to go and be able to swap the trays very easily. Then, to prevent the tray from sliding out if the box were picked up and waved around, I used magnets to hold the tray in place.
At this point, I loaded up the deck box with some sleeved cards to test it out. I shook the box around, trying to simulate conditions which were hopefully worse than anything that would happen in real use. I found that they mostly stayed in place, but they had some room to move above them, between the cards and the inside of the lid. They could be heard sliding and knocking around in there, which meant the cards could potentially become damaged if my friend were to strap the deck box onto the back of a bucking bronco for long periods of time.
Seriously though, I wanted the cards to be totally held in place because it’s a nice detail and makes the box feel more like a quality item. I decided to suspend a plate in the lid to reduce the amount of free space, as well as provide a flat surface for the cards to make contact with, rather than the varying contours of the actual lid. I was able to dial in a fitment that would keep the cards still, but was not so tight that the cards would be bent.
After adding that plate to the lid, I discovered that when the deck box was empty and the lid was at its fully opened position, the lid was heavy enough to tip the box over backwards. This was not an issue when there were cards in the box since they added more weight to the base, but in my opinion having cards in the box shouldn’t be required for the thing to stay put when open.
To solve this, I iterated the base’s design to have 4 deep holes, about 10 mm in diameter, down near the catch piece for the latch. These were for me to drop a ~10 mm ball bearing into each. I also designed a cover plate to be installed over the holes, and to put a little pressure on the ball bearings so they wouldn’t rattle. This added enough weight to keep the base planted while the lid was open.
Manufacturing Process
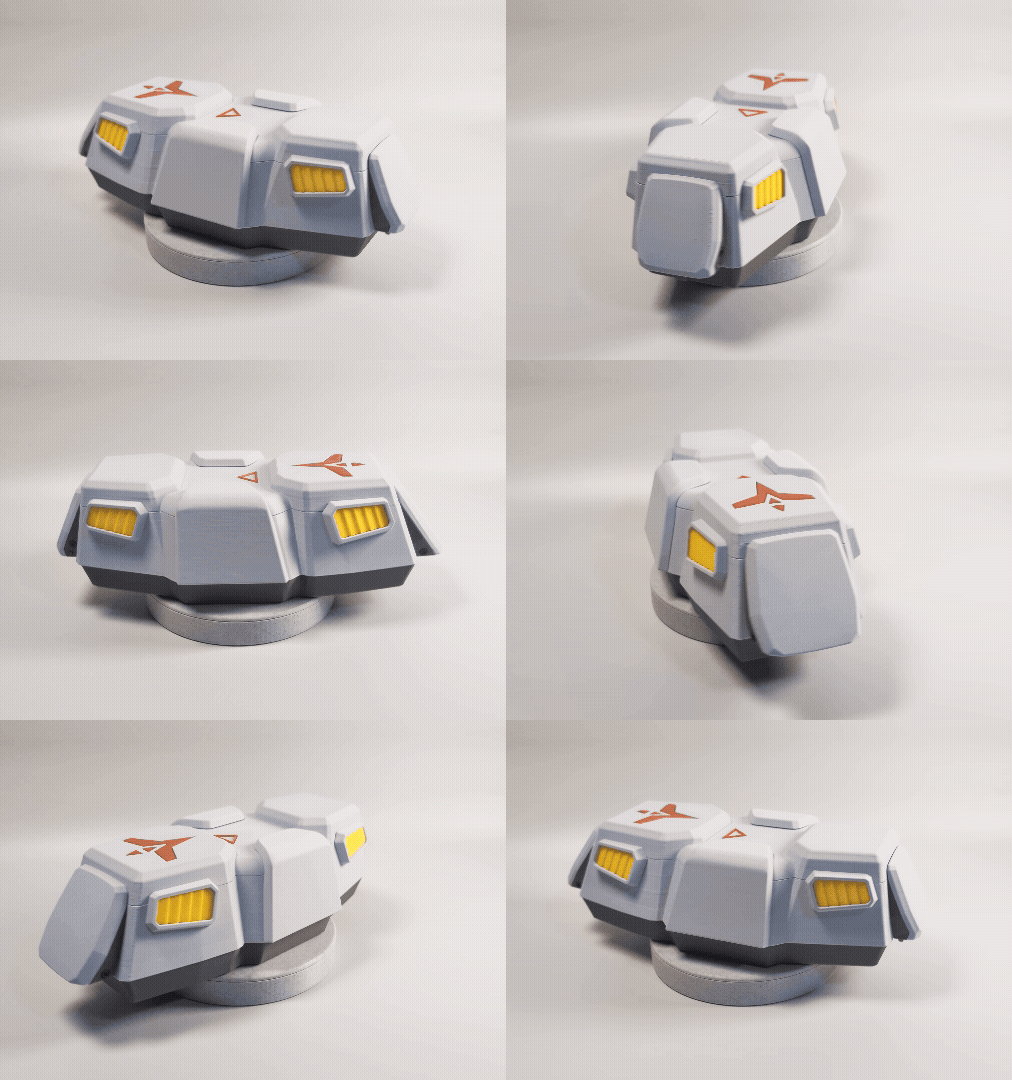
Most of the parts in this design printed without a hitch. There was one part which gave me a hard time, though – the box’s lid. The shape of the lid makes it a pain to print no matter which orientation you choose. Ideally you’d print it with the top of the box facing down on the print bed, so that you could just build up the walls and not have to essentially fill the area inside the lid with supports.
However, there is that central area on the lid which is at a different height than the rest, which means you need to support it. I didn’t want to do that because I didn’t want support marks smack in the middle of the most visible part of the design.
Long story short, I tried several methods of printing the lid and they all had their issues. I my last attempt broke it up into 3 chunks so I could print them separately, thereby allowing the box top to be printed on the plate, but the chamfered edges of the lid did not do well.
Then I ran out of the filament I was using for the lid, and it turns out this color is no longer produced, because it is a recycled PLA and apparently, there was a limited supply. This is too bad, because it’s a very light grey and I’ve had a tough time finding anything else like it. So, without a way to get more matching filament I had to stick with what I had. I ended up doing hours of sanding to fix the worst of the print issues, and while this deck box came out pretty well, I did not find a method which I would want to do again.

This is the reason I am not currently planning to produce these boxes to sell in my shop. I need to find a consistent way to print the lid with good results. I know I could do this by using custom modeled PETG supports, but that would be far too slow (and quite wasteful of filament) on my current printers.
Otherwise, the assembly was painless and I was pretty happy with the tolerances.
Testing Process
For the latch, I many repetitions of closing the lid while varying things like which part of the lid I was holding onto and how fast it closed, in order to test the latch’s ability to grab the catch.
With the lid closed, I tried to force it open without using the latch, to see what it would take for it to fail. I didn’t take a crowbar to it or anything like that, I just tried to pull it open with my hands from varying angles and different spots on the lid. I also tried pushing on, twisting and bending the overall lid assembly.
I tested the box’s ability to protect the card decks by putting two decks’ worth of sleeved pokemon cards (they are the same size as Gundam cards from what I understand) into it, closing the lid and shaking the box around in several different patterns like side-to-side, up/down, forward/back and then again with the box upside-down.
All of those tests revealed issues with my design.
Closing Thoughts
My hope for this design is that I can add a new 3D printer to my stable which has multiple nozzles; that would allow me to print the lid without issue. At that point I could produce these reliably and sell them in my shop.
Until then, my friend has the only existing prototype. A little while after I gave it to him, he told me he brought it to a tournament and it got a lot of compliments and interest, which is always great to hear. He also won that tournament, which makes sense; his awesome deck box distracted the opposition!
If you made it this far, thanks for reading!


